Do you want to read standard printed music? Check out our primer on how to read music for a thorough introduction to the basics.
Check out our articles on buying a child’s first keyboard and ten books to help your child learn to play piano and keyboard.
This guide works best for older children, teens and adults. If you are looking for something simple, colourful and suitable for your toddler or young child, check out our feature: how to teach young children to play music keyboard using coloured stickers.
Labelling Piano Keyboard: An Introduction
I created this “How to label notes on the piano keyboard” article based on a reader’s question.
Karen writes:
My 10 year old daughter has a 54 key keyboard and is teaching herself to play it. She is already mastering the songs from Mary Poppins along with some current chart music using her own ear.
My problem is that she wants me to be able to label the keys for her with the letters and numbers, but I know nothing about this and from what I have found on the internet it just confuses me further. I have spent a long time reading stuff on the notes and octaves but got no further.
This guide will hopefully make it easy to create a system that not only works now but can be used as a stepping stone to reading and writing standard musical notation.
Basic Keyboard Layout
Before embarking on labelling the notes of the keyboard, it’s important to understand how the keyboard is laid out — its structure.
If you look at any keyboard you will see that it is made up of a repeating series of 12 keys. How many times that series repeats depends on how many keys the keyboard has overall.
Here’s one section of a keyboard, starting with the white key immediately to the left of the pair of black keys, and finishing with the white key immediately to the right of the group of three black keys.
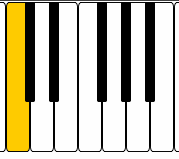
This set of 12 keys – seven white notes and five black notes – repeats across the whole keyboard. The pattern may well be cut off at the left and right ends of the keyboard, but this is the pattern of keys you’ll see repeated on any keyboard instrument.
Basic Piano Keyboard Labelling Techniques
The highlighted key in the diagram above is often called C (as in the third letter of the alphabet). It’s also known as “do” (from the do-re-mi scale that you’ve no doubt heard of from The Sound of Music).
The next white note to the right is labelled D (or “re”) followed by E (“mi”), F (“fa”), G (“sol”), A (“la”) and B (“ti”), before returning to C (“do”).
Only seven letters or sounds are used to describe the white notes on a keyboard, and they form a run of notes known as a scale.
The black notes are labelled in relation to the white notes they sit in between.
Each black key immediately to the right of a white note is said to be “sharp” and each black key immediately to the left of a white note is said to be “flat“.
You can probably see that, when using letters of the alphabet to name the notes, each black note can have two names.
To the immediate right of C is C sharp (C#), though it is also known as D flat (Db) because it’s also to the immediate left of D.
The complete run of notes in the diagram above — both black and white notes — is:
C – C#/Db – D – D#/Eb – E – F – F#/Gb – G – G#/Ab – A – A#/Bb – B
Twelve distinct notes.
If using the “do-re-mi” scale then each black note only has one name. The complete run of notes is:
do – di – re – ri – mi – fa – fi – sol – si – la – li – ti
But if this set of twelve notes repeats across the keyboard, how can you tell one “C” from another “C”, or an “A” from another “A”, or an “F#” from another “F#”?
This is where I’m going to recommend working only with the alphabetic names of notes. I personally find it easier, and shorter, to write down notes this way. If you want to stick to do-re-mi notation, that’s fine. Just substitute the appropriate name for each letter as:
| C | do |
| C#/Db | di |
| D | re |
| D#/Eb | ri |
| E | mi |
| F | fa |
| F#/Gb | fi |
| G | sol |
| A#/Bb | si |
| A | la |
| A#/Bb | li |
| B | ti |
Firstly, it’s important to find out where “Middle C” is. On a full-sized piano, that’s generally the “C” closest to the middle of the instrument, but on a smaller keyboard with less notes this might not be the case.
To help you find it, play all the “C” notes on your keyboard until you find the one that sounds the closest to the following note:
Middle C [MIDI file. Most modern PCs should play this automatically when you click on it]
It’s worth starting to learn what that particular C – Middle C – sounds like so that you can find it easily on any other keyboard or piano you might want to play.
We’re now going to introduce some numbers so that it’s possible to identify all the different notes on the keyboard.
“Middle C” will be known as “C4”. Why C4? Well, on a large piano it’s likely to be the fourth “C” counting up from the left hand side of the keyboard.
This is a fairly standard naming convention. It doesn’t matter if you don’t have that many notes on your keyboard.
This means that the first C to the left of “Middle C” will be “C3”, and the one to the left of that is “C2”, and the one to the left of that is “C1”. And so on (you’ll probably have run out of notes by now).
And, unsurprisingly, the first C to the right of “Middle C” will be “C5”, followed by “C6”, then “C7”.
The other notes of the C major scale (that is C, D, E, F, G, A and B ascending) are given the same number as the C to their left. Always ensure you have a complete run from C through to the B above using the same number before starting with a new number.
What about the black notes? Well, for now you can either call them “sharp” or “flat”, or if you really want to you can label them as both.
Here’s a fully labelled piano keyboard diagram that you can use to help you label your keyboard. Click on it to see the full sized version.
Practically, it’s probably worth using lightly coloured sticky labels that you can write the name of each note on and then stick either directly on each key, or above it on the casing of the instrument.
Writing Down Music Notes
Now that you’ve labelled the keyboard, how do you go about writing down the notes that you’ve played so that you can go back in the future and play them again?
It could be as simple as writing down the letter and number combination for every note that you play, but this doesn’t take into account the length of each note, or if there are any gaps/pauses in the music (often known as “rests”).
If you play mainly “by ear” and are writing the notes down mainly to jog your memory, this might not matter.
The first two lines of “Twinkle Twinkle Little Star” might simply look like this:
C4 C4 G4 G4 A4 A4 G4 F4 F4 E4 E4 D4 D4 C4
And if you know the tune well, you’ll automatically play each note with the correct length.
If you are interested in recording the length of each note, you could put the names of each note into a grid. To do this, you’ll need to count each “beat” in the music. The beat is a steady rhythm.
For “Twinkle Twinkle Little Star” it’s easiest to count in groups of four. Here’s how the first two lines would look.
| 1 | 2 | 3 | 4 | 1 | 2 | 3 | 4 | 1 | 2 | 3 | 4 | 1 | 2 | 3 | 4 |
| C4 | C4 | G4 | G4 | A4 | A4 | G4 | — | F4 | F4 | E4 | E4 | D4 | D4 | C4 | — |
You’ll see that I’ve used a dash where a note needs to be held on for more than one beat.
If there are any sections of music where nothing should be played, you could simply write an “X” or a “/” to indicate that nothing should be played (not even a held on note).
You might find in more complicated music that sometimes there’s more than one note in a beat. Then you’ll have to squeeze more notes into each space on the grid.
For example, here’s the first two lines of “Castle on a Cloud” from Les Miserables:
| 1 | 2 | 3 | 4 | 1 | 2 | 3 | 4 | 1 | 2 | 3 | 4 | 1 | 2 | 3 | 4 |
| A3 | B3 C4 | B3 | A3 | A3 | G#3 | A3 | — | A3 | B3 C4 | B3 | A3 | G3 | F3 | E3 | — |
Do you get the idea?
That’s just one method for writing down music in a fairly simple way.
It would start to get more complicated if you wanted to write down music where more than one note is played at the same time.
You could create a taller grid and write down groups of notes, but you’d have to remember which fingers on each hand you’d used to play them.
If you want to read other people’s music, you’ll probably find that it’s been written using standard modern musical symbols. It’s also very useful for writing down more complicated music.
That’s a bit much to handle in this article, but check out our how to read printed music primer for a thorough introduction of the basics.
I hope this guide helped you. If you have any questions do feel free to leave a comment below and I’ll help you out as much as I can.


56 thoughts on “How to label and write notes on the piano keyboard: a basic guide”
Thank you so much this was VERY helpful! I have one quick question though…I’m still a little confused about the black notes. For example in “castle on a cloud” you play G#3. so would that mean that its just the 3rd black note for that set of keys? since there’s five of them on each set.
Hi Erendida,
G#3 would be the black note in between G3 and A4 – the middle black note in the group of three
Andy
can sombody help me label a piano with 36 white keys. please
I have 36 keys on my keyboard, what are the letter notes? can someone send me a picture : emiliadrag@gmail.com
Can someone tell how to make a chord with dotes on a paper piano indicating the chord to be played. Is there a certain sofeware to use? I cannot do it with Photoshop. My altimate goal is to put the finished product in microsoft word to help make up a piano tutorial that will be added to my website. Would appreciate advice anyone can come up with.
how do you play the letters for castle on a cloud