Our guide on how to label and write notes on the piano keyboard is great for older children and adults who don’t yet wish to learn traditional musical notation, but it may still be too complicated for much younger children.
Introduction
If you are keen to teach your toddler or young child — now happily sitting in front of their new keyboard — some simple tunes, read on.
This guide offers a basic way to label a portion of the keyboard (one octave – that’s eight white notes) and then encourage your child to play simple tunes by recognising and matching colours.
In time, if your child shows interest and progress, you could introduce a more elaborate system in order that he or she can play more advanced melodies.
Equipment
Apart from a keyboard or piano with at least one octave (that comprises of eight white notes in succession, plus five interspersed black notes) you only need one other piece of kit in order to set up: adhesive labels.
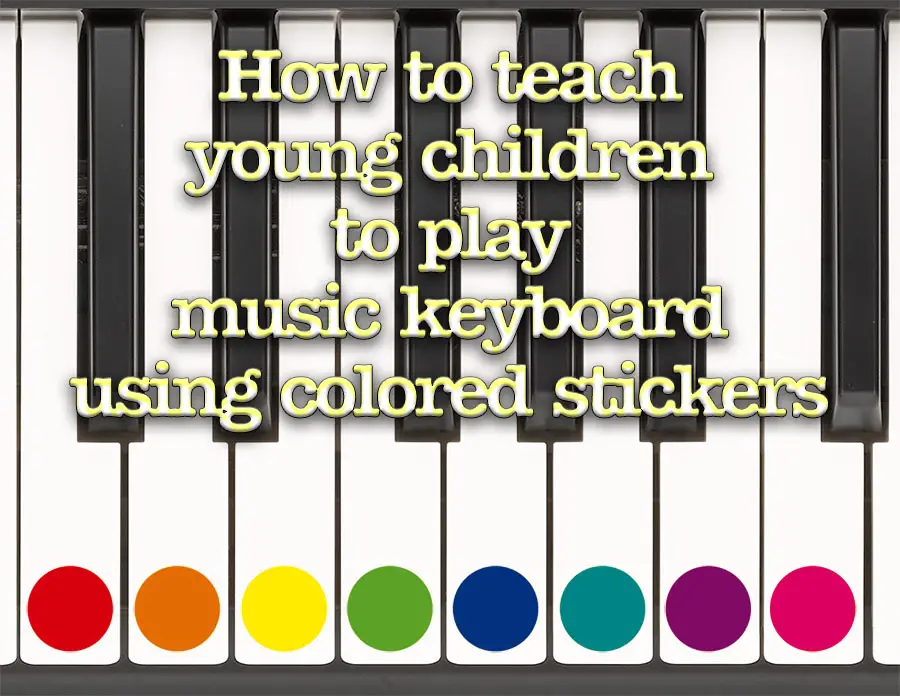
In order that you can follow the printed music we’ve prepared, you should ensure that you get a pack of stickers with at least one of the each of the following colours in:
Red
Orange
Yellow
Green
Dark Blue
Aqua Blue
Purple
Pink
In the UK, I find these coloured spine labels work well. Below are some current offerings from Amazon US which can be used. You may need to buy packs with a wider variety of colors in order to get the ones you require.
As an alternative, you could buy ordinary white circular labels and color them in yourself with felt-tipped pens (ensuring that the ink is suitable for the label and won’t come off when the keys are played).
Preparing the Piano or Keyboard
Firstly, you need to find the right section of the keyboard to affix the coloured stickers to.
Below is a diagram of a fairly standard five octave (61 key) keyboard instrument from Yamaha. All keyboards are laid out like this, but your model may have less or more keys.

What you’re looking for is a white note immediately to the left of a set of two black notes. Generally, you need to pick the one closest to the centre of the keyboard — this is likely to be what’s known as “Middle C”.
To help you find it, play all the “C” notes on your keyboard until you find the one that sounds the closest to the following:
Middle C [MIDI file. Most modern PCs should play this automatically when you click on it]
Once you’ve found your note, affix the red sticker either to the key (best) or on the plastic/wood/metal directly above the key.
Then, attach the orange sticker to the white key immediately to its right. Continue with yellow, green, dark blue, aqua blue, purple and pink.
You should now find a run of eight notes have coloured stickers on, and the pink sticker is also on a “C” key. See the diagram below:

Playing Melodies
Now your keyboard is set up, you can select some tunes for your child to practice playing.
We have prepared some very simple songs that only need, at most, this range of eight notes to play. The black keys are not used in this system (there’s plenty of time for that later!)
Now, all your child needs to do is to match the printed colours, working from top to bottom, left to right across the page, with the appropriately coloured key on the keyboard… then play it.
Does your child recognise the tune? Encourage him to keep practicing, and let him know that it’s OK to experiment and make mistakes, too. He’ll no doubt want to play other keys, or use both hands, and that’s absolutely fine. This is as much about encouraging exploration and learning music on his own, if not more, than simply following printed music.
The Music
Pick a link below to see printable PDF files containing some well-known songs.
Please note that, because this is a very simple system, it’s not possible to show detailed timings. Hopefully, because you’ll know the tunes, you can work out how long each individual note should last.
Very basic note lengths can be shown. Imagine each coloured circle is a single ‘beat’, and play each subsequent note at a regular interval. Blank (white) circles on the music indicate that the preceding note should be held for an additional beat.
Feel free to experiment with the timings yourself.
Expanding the System
The simple system only uses the eight white notes, but this does limit the melodies that can be played.
To introduce the black keys into a song, the system can be simply expanded so that the red, orange, green, dark blue and aqua blue can include a “+” sign within the circle on the printed music. If the player sees a + in the circle, this means to play the black key immediately to the right of the corresponding white key.
We’ll include some songs that use this more advanced method very shortly.
DIY
If you want to create your own melodies then you can download and print out our blank template that will allow you to create your own music.
Once the blank sheet is printed, simply colour or otherwise mark the appropriate circles to show which keys should be played.
What’s Next?
If your child has really taken to playing the keyboard, you might want to buy some piano books for kids so that he or she can explore further.
The most important thing is to always encourage your child to explore and learn at their own pace. Perhaps more formal music lessons would be good, but don’t force them on your child as it is possible to stifle their interest.
Most of all, enjoy the shared experience of music!