Standard musical notation might at first look confusing, but really it’s very logical. This guide will help you to read, interpret and play all but the most complicated printed music.
Staves and Clefs
The foundation of music notation is the staves on which it’s written.
Each staff is made up of five lines. Notes can be written to sit both on the lines and the spaces in between them, as well as above and below.
Most music written for piano and keyboard instruments is displayed on the “grand staff”. This simply means two staves joined together. See the diagrams below.

Treble clef

Bass clef
Grand staff
Music notation is written and read from left to right, just as most Western languages are.
The clef sign is displayed to the far left of each staff. Generally pianists will see music written in the treble clef (upper staff) and bass clef (lower staff). Middle C on the piano keyboard denotes the boundary between treble and bass clef.
The diagram below shows which note each line and space on the grand staff represents.
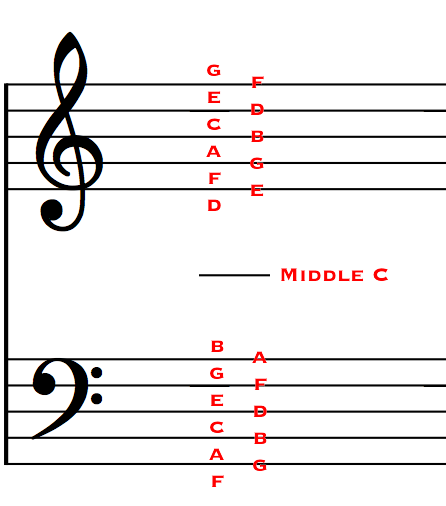
It’s also possible to represent notes higher or lower than this by using additional lines, called ledger lines, that sit above or below the grand staff.
Notes, Chords and Rests
Note symbols are used to tell the musician which notes to play on the keyboard and for how long.
Most notes look very similar. They have a round body which sits on a line or in a space on one of the clefs, and they usually have a ‘stem’ which points up or down and helps determine the duration of the note.
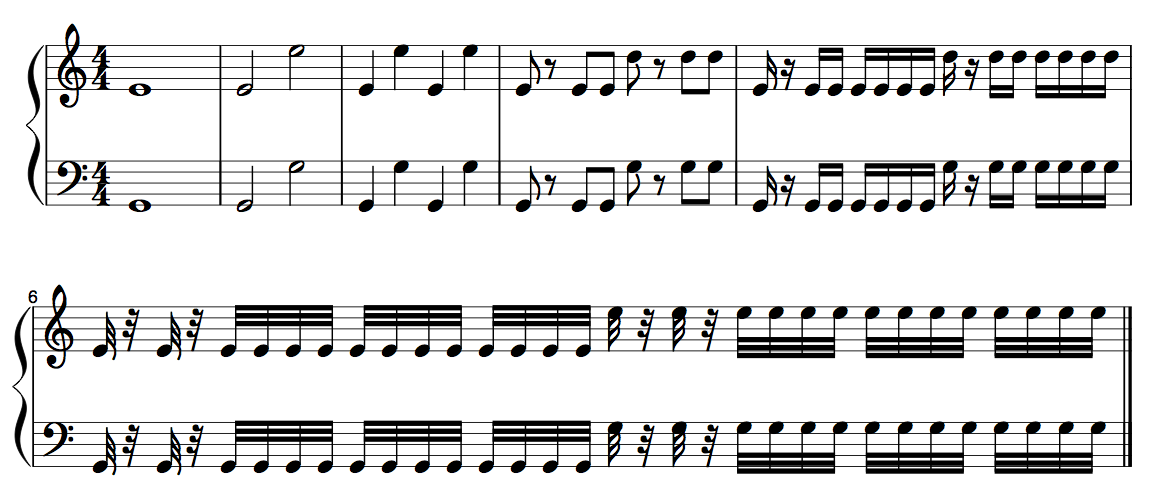
See the diagram below for the main note symbols (click for the full size diagram):
What we have here are six bars containing the most common types of notes you’ll see. There are others but they are used less often.
Here’s a description of them and their duration, with the name of each note as commonly used in the US, followed by the name often used in the UK:
| Bar | Note name (US/German) | Note name (UK/Classical) | Duration | Appearance |
| 1 | Whole note | Semibreve | Four beats | Hollow note head with no stem |
| 2 | Half note | Minim | Two beats | Hollow note head with stem |
| 3 | Quarter note | Crotchet | One beat | Solid note head with stem |
| 4 | Eighth note | Quaver | Half a beat | Solid note head with stem and one beam |
| 5 | Sixteenth note | Semiquaver | Quarter of a beat | Solid note head with stem and two beams |
| 6 | Thirty-second note | Demisemiquaver | Eighth of a beat | Solid note head with stem and three beams |
Higher pitched notes are written in higher vertical positions on the staff, whereas lower pitched notes are written in lower positions.
Generally, all notes that line up in the same position horizontally are played at the same time, and the space between notes is usually proportional to their duration, though this sometimes changes due to styling and layout considerations.
The ‘stems’ of notes can point either up or down. Generally notes above the middle line on a staff point the stem down, and notes below the middle line of a staff point the stem up, but this does vary sometimes for aesthetic or layout considerations, and doesn’t affect how the notes should be played (except sometimes it gives a clue as to whether the notes should be played by the left or right hand).
When the stem points up, it is drawn on the right-hand side of the note head, never the left. When the stem points down, it is drawn on the left-hand side of the note head, never the right.
Sometimes runs of the same type of note have their stems joined up. This tends to be more aesthetically pleasing and also helps to quickly identify a series of notes.
This can all be seen in the previous diagram.
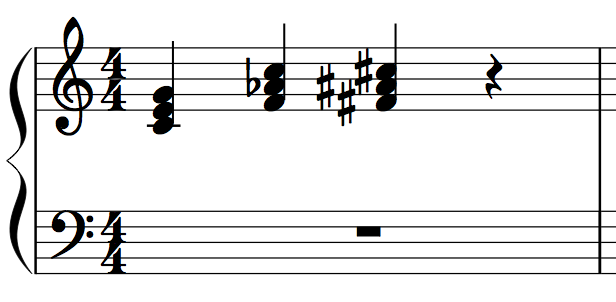
Chords are simply written by grouping notes together. Play these notes together all at the same time. Occasionally you may need to split chords between the two hands.
The following diagram shows C major, F minor and F sharp major.
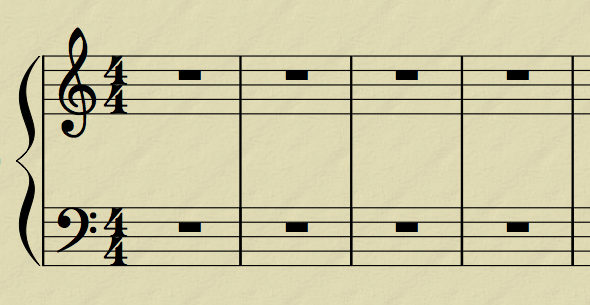
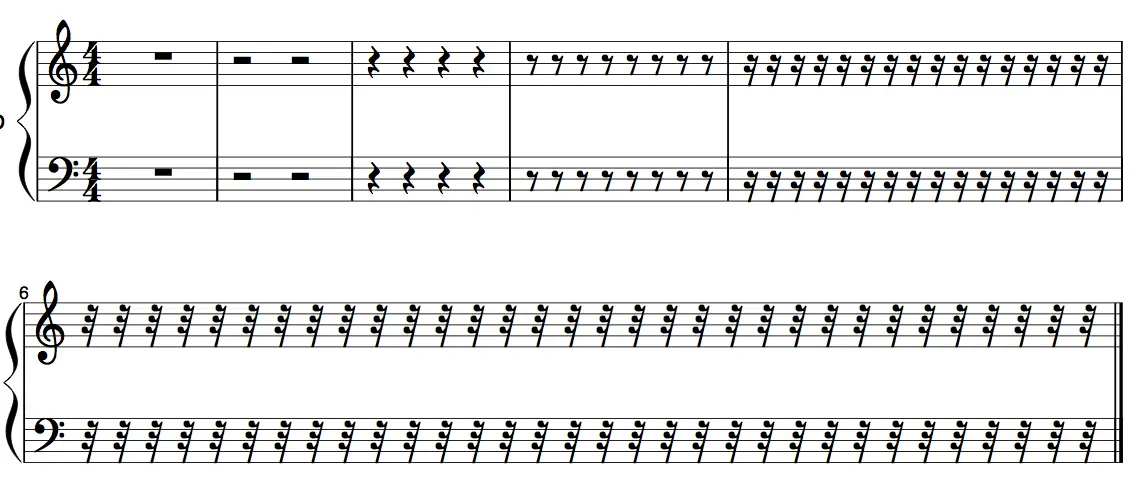
Every note also has an equivalent rest. These are written when nothing should be played on that particular staff.
The diagram below shows the main rest symbols.
These six bars show the equivalent rests for the note durations in the diagram above:
- whole note (semibreve) rest
- half note (minim) rest
- quarter note (crotchet) rest
- eighth note (quaver) rest
- sixteenth note (semiquaver) rest
- third-second note (demisemiquaver) rest
Time Signature
Every piece of music has at least one time signature (most only have one) which helps to determine the beat and rhythm.
These time signatures are written like fractions at the beginning of the first staff, plus anywhere in the music where they are changed (this is uncommon).
The top digit denotes how many beats are in each bar, while the bottom digit denotes what type of note each beat is.
So, a common 4/4 time signature means that there are four quarter notes (crotchets) in each bar. 3/4 means three quarter notes. 6/8 is six eighth notes (quavers), and so on. Generally the bottom number is (rarely) 2, usually 4 or 8.
The time signature and bars help to determine which beats in a piece of music are accented. Generally, the first beat of each bar is slightly stronger / heavier (even if only subtly), or the melody or some form of accompaniment is patterned in such a way as to make bars fairly obvious.
Not all music is like this — for example, some accents arbitrary beats — but for an example, think about a waltz. It has bars made up of three beats (ONE two three ONE two three), and therefore waltz music is written in 3/4 time. Marches are generally in 4/4 time (ONE two three four ONE two three four) or 2/4 time (ONE two ONE two). The majority of Western popular music, rock and other forms are in 4/4. And so on.
Key Signature
The key signature determines what scale the piece of music is in.
There are 15 major scales and 15 minor scales (not only twelve each, because some scales can be written in two different ways even though they sound the same), and a piece of music can be written in any one of those (there are a lot of other musical scales, by the way, but those don’t tend to affect a written key signature)
Think of the piano keyboard. A “sharp” note is a note that has been raised by one key, while a “flat” is a note that has been lowered by one key.
The note of D can be made D sharp, in which case you play the black note to the right of the white key representing D. D flat, on the other hand, is the black note to the left of the white key representing D.
It’s the same for all other keys. Generally, sharps and flats are written before white notes that are to become black notes (C to C sharp, D to D flat, D to D sharp, E to E flat, F to F sharp, G to G flat, G to G sharp, A to A flat, A to A sharp, B to B flat) but in fact you can sharpen or flatten any note: B sharp is C. F flat is E.
And just in case you were wondering, A sharp is the same note as B flat. F sharp is the same note as G flat. It just depends on how the music is notated.
So, back to key signatures. Every major and minor scale has a mix of white and black notes (except C major / A minor) but notes written on the stave are by default all white keys.
Look at the D major scale. It has a C sharp and an F sharp in it, so if we write a piece of music in D major, we have to find a way of telling the player to sharpen every C and F note. That’s how the key signature works.
The key signature is made up of sharp and flat symbols, and is written at the beginning of every staff. Here’s what D major looks like (it could also be a piece of music written in B minor, by the way).
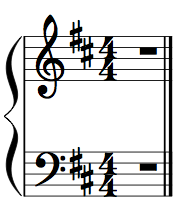
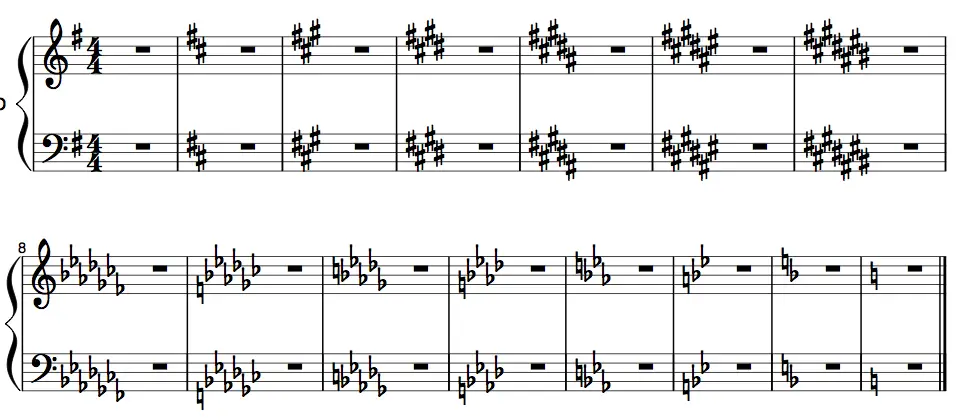
It works the same for every other scale, except C major and A minor which don’t need a key signature. Here are all the key signatures.
In order, those key signatures are:
Top Line:
- G major (E minor)
- D major (B minor)
- A major (F sharp minor)
- E major (C sharp minor)
- B major (G sharp minor)
- F sharp major (D sharp minor)
- C sharp major (A sharp minor)
Second line:
- C flat major (A flat minor)
- G flat major (E flat minor)
- D flat major (B flat minor)
- A flat major (F minor)
- E flat major (C minor)
- B flat major (G minor)
- F major (D minor)
- C major (A minor) (no sharps or flats)
It’s worth noting that, although there are only 12 distinct major and 12 distinct minor scales, in order to allow every key signature to be used (one to seven sharps, one to seven flats, plus C major (A minor) which has no sharps or flats) there are in fact 15 key signatures: C sharp major (A sharp minor) and D flat major (B flat minor) are effectively the same, as are F sharp major (D sharp minor) and G flat major (E flat minor).
If a piece of music needs to change key signatures part of the way through, then a new key signature is placed at that point on the stave, and takes effect from then on.
An interesting point about changing keys is that you have to “undo” any sharps or flats from previous key signatures before you can use the new one. Look at the diagram and you’ll see on the second line there are “natural” symbols (the squarish symbols with two beams) before the flats, This effectively says to cancel out that particular flat from before.
So, going from C flat major to G flat major (bar one to two on the second line), the F flat has to be cancelled out with the natural.
Ledger Lines and Octave Marks
With 88 notes on a standard piano keyboard, it’s clear that the grand stave doesn’t have enough lines and spaces to accommodate them all, even though the extremities of a piano keyboard are less often played.
To handle this. we have ledger lines and octave marks.
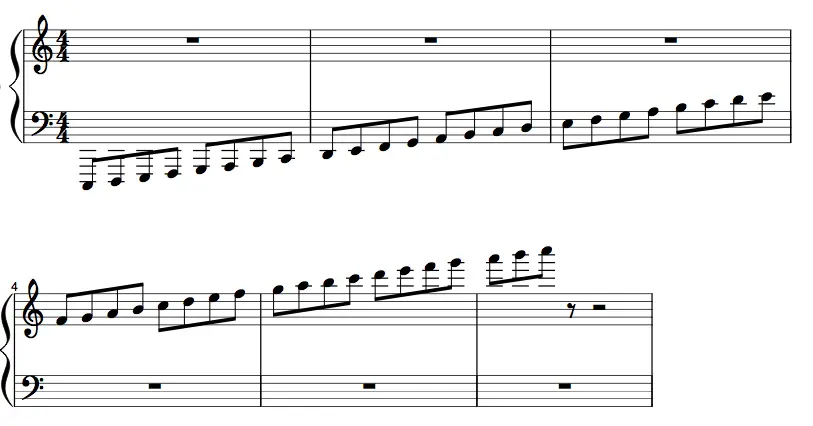
Ledger lines are lines above and below the main staff that allow for higher or lower notes to be represented. You’ve already seen this with “Middle C”, which sits on its own ‘ledger line’ either below the treble clef or above the bass clef. The notes are continuously named both up and down. See the diagram below for a scale from the C three octaves beneath middle C to the C three octaves above it.
Just so you get the idea, the bass clef continues its notes to the E above middle C, before the treble clef takes over from the F above middle C. This just shows that middle C isn’t necessarily a barrier between the two written clefs. It’s often used to make it easier to see which hand should play which notes, or to help avoid a cluttered layout.
It’s not always convenient to have large numbers of notes on ledger lines, because it can be hard to work out what notes to play and it uses up a lot of vertical space. To this end, we also have “octave marks” that tell the player to shift a range of notes up or down one or two octaves from the position in which they’re written.
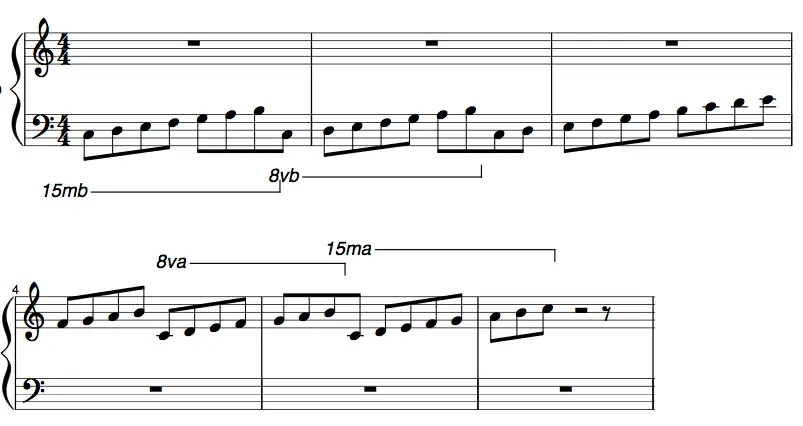
Here’s the above example written using these octave marks instead.
- The 15mb mark means to play the notes two octaves lower than written, for the duration of the line.
- The 8vb mark means to play the notes one octave lower than written.
- The 8va mark means to play the notes one octave higher than written.
- The 15ma mark means to play the notes two octaves higher than written.
Note Modifiers
There are a number of symbols placed on or around the standard notes that tell the player to do something different before, during or after playing that note.
Sharps, Flats and Naturals
As we’ve seen, the key signature tells the player which notes should be sharpened or flattened throughout a piece of music.
However, sometimes we want to ‘override’ the key signature. Say we have a piece of music in D major but we want an unsharpened C. The key signature tells us to play C sharp, so we put a ‘natural’ symbol in front of the C note. This takes priority over the key signature just for that bar. (Just to be awkward, we could have avoided this by writing a D flat instead.)
Say we want to play a G sharp. The key signature doesn’t have a G sharp in it, so usually whenever we come across a G note, we play the white note. Putting a sharp in front of a G tells the player to sharpen that note.
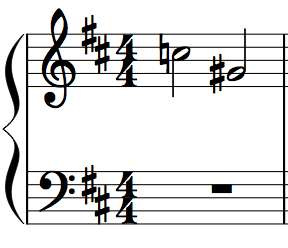
The same is true if we want to flatten a note.
These are called ‘accidentals’ and are very useful.
Ties and slurs
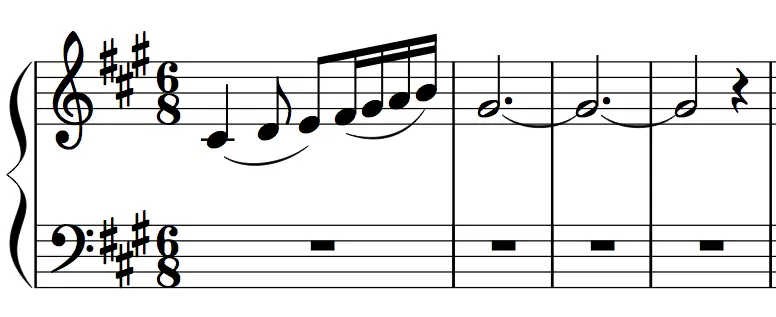
Ties are used to join two or more notes of the same pitch together, creating a single note of longer duration.
Slurs are used to join two or more notes of different pitches together, requesting that they be played as smoothly as possible (i.e. without any noticeable gaps between them)
They both look similar. A curved line is drawn between the affected notes. See the diagram.
In the first bar above, the first three notes should be played smoothly, and the last four notes should also be played smoothly.
In the second to fourth bars, two dotted minims and a minim are joined, making one single tied note that lasts for eight beats. The G sharp is played once in bar 2 and then held until the rest at the end of bar 4.
Staccato Dots
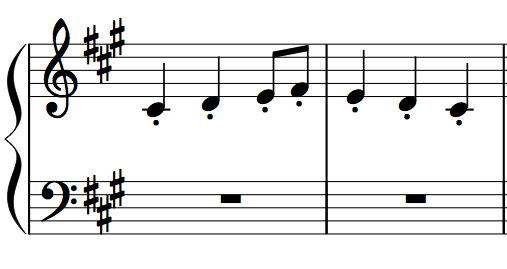
A dot just above or below a note’s head (where it is depends on which way the note’s stem is facing) means to play the note ‘staccato’. In other words, depress and release the note on the keyboard quickly, rather than holding it for the duration of the note, then wait for the rest of the note’s duration before playing the next note.
In the diagram above, all seven notes are played quickly and sharply.
Accents
A little > sign above or below a note’s head denotes an accent. This means to play the note just a bit stronger (louder) than the surrounding notes. This is partly up to the player’s discretion.
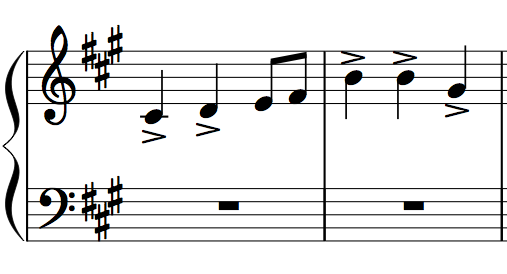
Here, the first, second, fifth, sixth and seventh notes should all be played slightly more firmly/loudly than the third and fourth notes.
Pauses
A pause sign above or below a note’s head denotes a pause. This is a discretionary pause in the music, usually not for very long, before the player moves on to the next note.
Here, a discretionary pause is placed on the middle C in bar 2 and the high E in bar 4. The player would likely make each note last somewhat longer than 3 beats, which is how long a dotted minim (half note) would normally last.
Expression
Symbols denoting various types of expression are often placed in the space between the two staves on the grand staff.
Volume
Symbols such as ppp, pp, p, mp, mf, f, ff and fff are used to tell the player how loud the music should be overall.
Here we have:
- ppp – Pianissimissimo – play extremely quietly so as almost inaudible
- pp – Pianissimo – play very quietly
- p – Piano – play softly
- mp – Mezzo piano – half as soft as ‘piano’
- mf – Mezzo forte – half as loud as ‘forte’
- f – Forte – play loudly
- ff – Fortissimo – play very loudly
- fff – Fortissimissimo – play extremely loudly
Getting louder and quieter
“Hairpin” marks < and > are used to show where passages of music need to get gradually louder (crescendo) or quieter (diminuendo). Volume marks are often used at the end of this gradual change to tell the pianist how loud the piece of music should end up.
Here we have a ‘crescendo’ (getting louder) for the first two bars followed by a ‘decrescendo’ or ‘diminuendo’ (getting quieter) for the final three bars. Often there will be loudness marks (ie pp, p, f, ff) at the start and end of these to give some idea of dynamic range).
Repeats
There are several pieces of musical notation used when one or more bars of music should be repeated.
Repeat Signs
The most common form, when a section should be repeated once more exactly as written, is the double-dot and double bar line notation.
Repeats are marked at the start and end of bars (represented by the downward line spanning the entire staff). Think of it as a form of bracket that surrounds the range of bars that should be repeated.
When you come across two dots at the end of a bar AND a double bar line (two vertical lines, one thicker than the other, as opposed to just a single thin vertical line) it means to return to either the beginning of the piece, or the previous double bar, or the previous beginning repeat marks, whichever is closest.
Look at the following diagram which shows that the last three bars should be repeated once. If the starting repeat marks in bar 3 weren’t present, the whole piece of music to that point would be repeated, right from bar 1.
Other types of repeat marks you may find are detailed below.
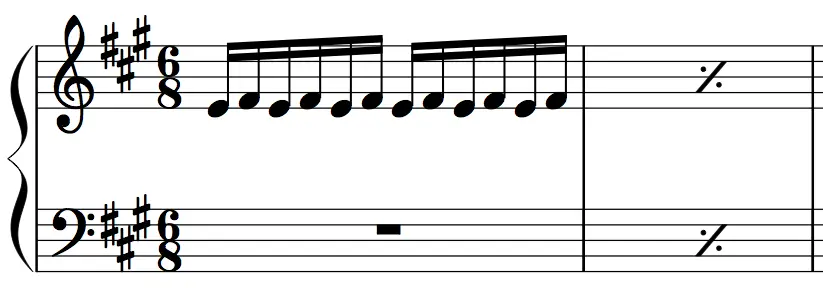
Simile Marks
You probably won’t see these a lot, but if you do they mean to repeat the previous one or two bars one more time.
Here, the first bar should be repeated, then continue with the rest of the piece.
Volta Brackets
These denote that the ending of a repeated passage should be played differently on the first and second time round.
On playing the first time through, play everything up to and including the bars spanned by the ‘1st time’ bracket. On repeating the passage, play everything up to the beginning of the 1st time bracket and then jump to the beginning of the ‘2nd time’ section, and play all of that.
In the example above, play bars 1, 2 and 3, then repeat back to the beginning and play bars 1, 2, 4 and 5, then finish.
D.C. and D.S.
Da capo: Marked as “D.C. al fine” or “D.C. al coda”.
D.C. al fine means to repeat the entire piece of music again but to stop whenever the “Fine” mark is seen.
D.C. al coda means to repeat the entire piece of music again until the Coda sign is reached, then jump to a final set of bars which mark the ending of the piece.
Da segno: Marked as “D.S. al fine” or “D.S. al coda”.
Very similar to the “D.C. al fine” and “D.C. al coda” except that the player returns to the last “Segno” mark rather than the beginning of the piece of music.
Above we see “D.C. al Fine”. In this case play bars 1-5 through once, then play bars 1-3 and stop at the “Fine” mark.
Above is “D.C. al Coda”. In this case play bars 1-5 through once, then play bars 1-3 again, then finally jump immediately to the bar marked with the Coda sign at the beginning, and continue playing.
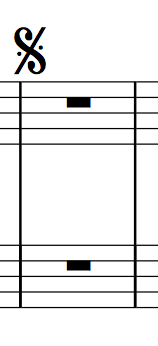
“D.S. al Fine” and “D.S. al Coda” work in the same way, except the previous Segno mark is returned to rather than the beginning of the piece. The Segno mark looks like this:
Pedal Marks
Pedal marks are used to show where the composer or arranger would depress and raise the damper (sustain) or soft pedals. If the music omits these, you can still add pedal to your own taste (in fact, most types of music benefit from at least a little pedal work).
The damper (sustain) pedal markings are shown under the staff or grand staff. The “Ped” mark is used to denote depressing the sustain pedal. This may be followed by a solid line leading to a vertical line where the pedal should be lifted, or alternatively no line, but a * symbol when the pedal should be raised.
The soft pedal is not marked to be used very often, but if it is to be used, it is marked in the music as “una corda” when the pedal should be depressed, and “tre corda” when it is to be released.
Hint: If you are playing an electronic keyboard instrument without a soft pedal, you may find there are other ways to control the piano sound to achieve a similar effect, such as using a modulation wheel. This will depend on the instrument model, settings, plus any other software you might be using. The soft pedal is generally not called for in most popular music.
Tempo
If a general or specific tempo (speed) is required, it is often written at the top-left of the music.
If it’s general, it could say something like “Slowly” or “Quickly” or “Waltz Time”.
If specific, it will likely have a single note followed by an equals sign (=) and then a number. This is the beats per minute (BPM), and could be set using a metronome. It’s generally only a guide to how fast or slow a piece of music should be played.
Conclusion
This guide covered the most common elements of musical notation. The best way to familiarise yourself with these concepts is to find simple printed music for pieces you already know and study their structure. Then move on to gradually more complicated pieces.
There are a great many other symbols and words that can occur on printed music, particularly more complicated classical and other formal scores, but for the most part this primer will see you through a large portion of printed music available, and even if you don’t fully understand every symbol, you will still be able to read and play the notes with basic expression. For your own enjoyment, that’s probably enough.
If you are looking for a book that simply explains musical notation, but includes some of the more advanced symbols and concepts, I highly recommend How to Read Music by Roger Evans. It’s quite difficult to get hold of now, but it’s definitely worth looking at.









2 thoughts on “How to read printed music: a basic primer for pianists and keyboard players”
Thanks. Once again, very useful for the returning pianist who needs a few reminders!
I really enjoyed this piece.l now have little idea of what reading sheet music is about.tanx